
Recipes
Make Ahead Breakfast Breakfast Sandwiches: Easy Budget Friendly
Make Ahead Breakfast Sandwiches:
Easy Budget Friendly Idea
This post may contain affiliate links. If you make a purchase through these links, I may earn a small commission at no extra cost to you.
Today, I want to show you how to do these make ahead breakfast sandwiches and what eating at home can really do for your budget. I know, I know — mornings are busy, and it’s so much easier to grab something out. Trust me, I’ve been there. I used to eat out a lot. Too often, honestly — several times a week grabbing breakfast or lunch.
I convinced myself that the only way to get my kids ready and out the door for school on time was to feed myself later and run through a drive thru after I had dropped them all off. But then I actually looked at our budget. And I was shocked at how much money I was spending eating out every single month.
Money was flying out of our account — money that could have gone toward other things and goals we had as a family.
That’s when I decided there had to be a better way. I refused to wake up any earlier to make myself food. I needed something that was already made and ready to eat, or that I could heat up quickly and take on the go in the mornings.
So I started making a list of the breakfast foods I was always grabbing out — and decided to make them at home instead. The crazy thing? It saved me so much money.
These budget make-ahead breakfast sandwiches are one of my favorite things to prep and keep ready to grab in the morning. You might be surprised how much money you save by making these in bulk and having them ready to go. And as a bonus, my kids love them too — which makes it a total win-win.
This isn’t necessarily a recipe, but more of a cost breakdown and breakfast idea that you can completely make your own. Let’s jump in.
Why Make-Ahead Breakfast Works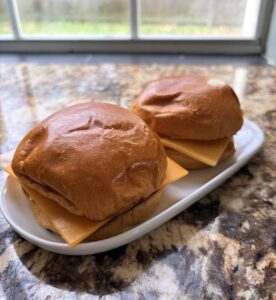
- It saves so much time and stress in the morning
- Removes decision fatigue for every morning
- You won’t keep skipping breakfast! You need to eat too!
- Good for on the go busy mornings
Cost Breakdown
So how much money will it actually save you?
One of the biggest reasons I started making breakfast sandwiches at home was the cost. When I sat down and priced it out, the difference was eye-opening. It made me actually want to start eating at home and saving that wasted money.
Below is the real breakdown using current prices from Aldi and Walmart in my area.
Cost Per Sandwich at Home
Aldi
- English muffins/buns: $0.71 each (6-pack)
- Eggs: $0.18 each
- Cheese: $0.16 each
Total cost per sandwich: $1.05
Walmart
- English muffins/buns: $0.43 each (8-pack)
- Eggs: $0.17 each
- Cheese: $0.14 each
Total cost per sandwich: $0.74
Cost Comparison: Homemade vs. Eating Out
This is where the savings really add up.
Cost per sandwich
Homemade (Aldi) – $1.05
Homemade (Walmart) – $0.74
Fast-food breakfast sandwich – $4–$6+
Coffee shop sandwich – $6–$8+
(Prices vary by location, but this is a typical range.)
What That Looks Like Over Time
When you compare these costs over the course of a month, the difference becomes hard to ignore.
• Buying breakfast out 3 times a week at $5 each: ~$60 per month
• Homemade breakfast sandwiches from Aldi (3x/week): ~$12.60 per month
• Homemade breakfast sandwiches from Walmart (3x/week): ~$8.88 per month
That’s roughly $40–$50 saved every single month from one small habit change — just breakfast.
Why This Works So Well
When I actually broke it down, one homemade breakfast sandwich cost me between $0.74 and $1.05, depending on where I shopped.
Compare that to grabbing breakfast out, where a basic egg and cheese sandwich is usually $4–$6, and sometimes even more.
Making them at home costs less than a quarter of the price, and the best part is that they’re already made and ready to grab all week long.
How I Make Breakfast Sandwiches

Bread
My favorite bread to use is a brioche bun. You can find these in the bread or bakery section at most grocery stores. Not a fan of brioche buns? Switch for your favorite breakfast bread and make it your own! You could use bagels, biscuits, regular sandwich bread, english muffins – anything you love! Whatever you are using, I recommend toasting the bun so it doesn’t get soggy!
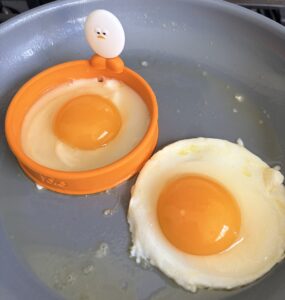
Egg
The prices of eggs vary widely. My family prefers to spend a little extra and purchase good quality eggs (like pasture raised or free range) because we eat so much of them and the dark orange yolks have so many great vitamins and nutrients. You can also cook them any way you like – fried or scrambled, runny or more done! I like using this silicone egg ring so it’s the perfect shape for the sandwich, but it is totally optional! I think it makes things easier. Whatever eggs you decide on, don’t forget to salt and pepper them when they’re done! Don’t skip adding flavor!
Cheese
This pricing also varies widely. We sometimes buy the cheapest cheese to save money, but we also love a good quality cheese like this Tillamook Cheddar Cheese. I also find that some brands melt better than others. This Tillamook melts like a dream! (It’s on the more expensive side though.) But you use what you love! We usually use Cheddar slices because it’s a crowd pleaser, but it would be great with Pepperjack, Colby Jack, Gouda – really any cheese you love! Tip: Add the cheese right after the egg is done cooking if you are eating right away. It will get melty and perfect!
Toppings & Other Additions
This is where you can totally make these your own!
- Sauce – I don’t know about you, but I’m a sauce girl. I love adding sauce to EVERYTHING! For these, I usually add a little bit of mayo to add some flavor. If that’s not your thing, you could add a garlic aioli, sriracha sauce, or anything else you love!
- Breakfast Meat – You of course can add bacon or sausage to these for added protein! Bacon makes everything better in my opinion! I just don’t always have the time to make bacon or sausage before stocking the freezer with these. Again, make these your own! Do what your family loves!
- Greens – These would also be great with some arugula or spinach for some added freshness!
How I Store The Breakfast Sandwiches
Once the sandwiches are assembled, I let them cool slightly. This helps prevent condensation and soggy bread.
I wrap each sandwich in parchment paper, then wrap again in aluminum foil. If I’m keeping them for later in the week, they go straight into the fridge. For longer storage, I place the wrapped sandwiches into a zip-top freezer bag and store them in the freezer.
Storage timeline:
• Refrigerator: up to 4 days
• Freezer: up to 2–3 months
Reheating these Make Ahead Breakfast Sandwiches
For refrigerated sandwiches, I remove the foil and keep the parchment paper on. I prefer reheating them in the oven, but you can also warm them in the microwave until heated through.
For frozen sandwiches, I remove the foil and reheat them in the parchment paper. I usually prefer heating frozen sandwiches in the oven at 350°F until warmed through. If using the microwave, I recommend reheating in short intervals so everything warms evenly.
Encouragement
I used to get really overwhelmed trying to overhaul so many things in our life and our budget that I ended up quitting and going back to my bad habits.
I want to encourage you to start with one small things. For me, the breakfast at home swap only worked because I thought of things we loved and made the prep work for our life and schedule. I started with one thing and once that was working well into our schedule, I tried another.
These small swaps add up over time! You can do it one step at a time!
Leave a review!
I hope you love these Make Ahead Breakfast Sandwiches!
If you use this breakfast idea, I’d love to see it!
Send me a picture or leave a review!

Thanks for being here 🫶🏻
I’m Taylor — I share easy recipes for families that work for real life.
If you enjoyed this recipe, you might also love:
Our other favorite breakfasts:
Yummy Chocolate Chip Banana Bread Baked Oatmeal
Sweet Potato & Sausage Egg Breakfast Casserole
My other recipes
My family favorites meal plan
👉 Join my email list here!
You can also follow along here:
Instagram
Facebook
Pinterest
happy cozy cooking,
♡ taylor
My Must-Have Sourdough Tools for Stress-Free Baking
Ready to bake your first loaf, but unsure what tools you actually need? This simple, no-fluff guide walks you through the exact items I use in my kitchen so you can skip the overwhelm and start baking with confidence.
